
7 STAGES TO VISUALIZING YOUR BLUEPRINT AND SAVE MONEY
Let us show you how we create a complete visualization of your development at every stage while reducing costs.
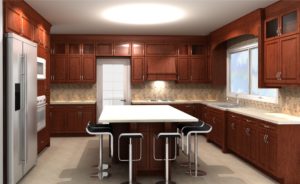
The best way to understand and have a feel for a new home is to see it in 3D rather than having to rely on your imagination to see if the bathroom door will be too far away from the kitchen or if a particular window size, or location, in the kitchen, the most important room in the house, may compliment the design or ruin it. Conceptualizing in three dimensions allows you to virtually walk through the home before even approving the specs or designs. Want to see that living room wall with bay windows? No problem. Want to check out the view from the top floor window? Step right up. Changed your mind and now want no window? Sure.
stage 1 … blue print adjustment


As you know, the planning stage is the most crucial stage in the development of any property. There for, prior to submitting your blueprints to the city, we can sit down with you and turn your 2D prints into 3D plans. This will allow you to determine if your expectations of how your blueprint should turn out will be the same as how they will turn out. We are that confident that we can create a hard copy output from your input in advance so you will be aware of any changes that are necessary to those blueprints before breaking ground.
stage 2 … elevation consideration
At this stage it is important to finalize the elevation finishing. As you know, a blue print can be developed on the exterior in a multitude of different ways. We will sit down together and consider various options for how you want the exterior to look and what will need to be purchased to create each finish. We can now begin to visit the various suppliers showrooms … in my office.
Option-1 Option-2


Option-3 Option-4


stage 3 … purchasing exterior materials
Let’s eliminate the guess work. If you are investing between $800,000 to $2,000,000 or more and you do not know how it will look when completed how can you be sure you are spending those dollars wisely. From our options that we have created you can now compare which one is most suitable for your project budget. We will be able to determine materials by visiting various suppliers catalogs that are directly integrated into our software and then compare pricing between these suppliers to ensure you get the most cost effective outcome.
CHOOSE Type of wall finishing
A-stone


B-bricks


NOW COMPARE PRICING BETWEEN COMPETITORS
A1- Coronado stone A2-Cultured stone
A3-Eldorado stone


CHOOSE Type of roofing material
A-shingles


B-shakes


NOW COMPARE PRICING BETWEEN COMPETITORS
A1- Certainteed A2-Owens Corning


A3-James Hard

stage 4 … process of interior designing

The six rules of designing:
1.Space and Planning
2.Colour
3.Lighting
4.Pattern and Texture
5.Balance and Order
6.Personality
Designing the house is not just about knowing your tastes, but also how you think about it. There are two ways to approach the design ……. the ‘part-to-the-whole’ or the ‘whole-to-the-part’.
Do you ask about the process? Do you pay attention to every detail? Do you seen hyper-organized? Ask yourself “Do I read the book slowly and carefully without skipping paragraphs?”. If you answered YES to these you are a ‘part-to-whole thinker’. In this type of designing process we choose piece by piece, step by step and expand to whole house.
Example
We choose a kitchen style: Traditional / Transitional / Contemporary, then we choose the kitchen finish: paint / stain, and then the kitchen tone: light / dark And then continue designing the rest of the house based on that room (whether it be the kitchen or front room, etc.).
On the other hand, Are you are primarily interested in the bottom line? Do you seem bogged down by details? Are you a big picture person? If you answered YES to these you are a ‘whole–to-part’ thinker. In this type of designing process we decide on a whole house style: Traditional / Transitional / Contemporary / style. Once the house style has been decided, we then choose all of the items to fit into that style.
The next step is to work with you to determine what colours should be used based on what mood you desire for that particular room. For instance, a calming colour would be appropriate for the bedrooms whereas a more vibrant colour would be selected for the living room. There are also tricks that can be used with colour to assist your floor plans. Examples of this are using lighter colours to make a room look bigger, or by using darker shades to make a long corridor seem shorter, or by using bright colours to make the expensive flooring stand out better.
Lighting comes next, to make a room look taller than it really is you would opt for floor lighting that shined upward (with preferably a darker floor), to make a room seem longer you could choose a focal point (such as a statue or painting) and shine a spot light or track light across the room at it.
Patterns and texture can be used to break up the monotony of a dull room. This can be achieved by creating a feature wall that displays blocks or has wallpaper, etc. It is important to know that using small patterns will give you more depth and conversely big patterns with give you coziness. We must also remember that using vertical lines on the walls will give the effect of a taller ceiling should that be desired.
Next is balance and order. This means one should not use too much texture or colour in any one room as it will overwhelm and conflict with each making the room feel ‘uneasy’.
Lastly, the personality of the builder or the home owner is so very important as a room can be decorated in a variety of different ways using the same budget.
stage 5 … selecting interior materials
The only thing as important as ensuring that you stay on budget is ensuring that everyone in the household will be OK with what is being created. That is where sitting down with all of the members of the home and getting input from everyone with regards to the main colours and/or textures is so important. This will not only let each person know what is being built in advance, but also prevent future arguments.

CHOOSING PAINT
SELECTION A … Behr SELECTION B … Benjamin Moore


SELECTED … Behr
Blue 1 Blue 2 Blue 3


Our software allows us to offer you the ability to make real decisions. By this we mean that you will now be able to decide whether or not a traditional or contemporary kitchen will ‘fit’ with the rest of the interior design. With just a few key-strokes we can show you a multitude of different styles of kitchens that will accommodate the same square footage. This will potentially save hundreds, if not thousands, of dollars in future renovations.
STYLE SELECTION
Traditional style

contemporary style

Now that we have determined what style of kitchen will best suit the interior concept, we can move on to figuring out what colours will best suit the design. Again, our software allows us to easily create a variety of different options to choose from. And without sounding repetitive, this will once more potentially save hundreds, if not thousands, of dollars in future renovations. This is also a very important feature to offer homeowners as it will elevate the challenges discussed as above.
COLOUR SELECTION
Paint (Light colour)

Stain (Dark Colour )
stage 6 … purchasing interior materials
As with determining what to purchase for exterior materials we have to make similar decisions for the interior. By creating a completer floor plan rendering we can instantly find options and make choices. From our options that we have created you can now compare which one is most suitable for your project budget. And again we will be able to determine materials by visiting various suppliers catalogs that are directly integrated into our software and then compare pricing between these suppliers to ensure you get the most cost effective outcome. And this is all done while you sit beside me in my office!y
CHOOSE TYPE OF FLOORING
A … tile


B … wood flooring


CHOOSE type of wood flooring
A-laminate


B- real wood (hardwood)


NOW COMPARE PRICING BETWEEN COMPETITORS
B1 .. Armstrong B2 .. Carlisle


B3 .. Pravada

stage 7 … landscaping
A Garden is basically a collection of plants of either the flowering or non-flowering type or combination of both arranged in a way that they complement and balance out each other.
There are a couple of easy steps a beginner gardener can follow in designing a garden:
1.Know your purpose.
Ask your self —what do I want a garden for ? A garden can be started for a lot of reasons. To simply serve as a calming nook or to serve something more functional such as a source for food or spices so think and decide want you want. Ones you decide kind of garden will determine the kind of plants that will be in it.
2.Consider the climate.
Plants are dependent on climate. some plants can only grow and thrive on specific types of climates. So whether you live in a palace with tropical weather or one with four seasons or a place that is consistently hot or cold know the best kind of plants to grow in our climate.
3.Consider the time of the year.
Plants also follow the calendar and the seasons. So depending on the time of the year you decide to start garden ( climate at that time of calendar) you must choose the appropriate seedling and seeds to plant. Eg. Spring bulbs such daffodils should be planted during the winter ,while shrubs and perennials are better planted during autumn in more temperate zones –following seedling calendar for your region.
4.Choose a focal point
Ones you decide what kind of garden you want, plan out. Focal point It could be bench at the end or statue or sculpture, fountain, ponds, pergola or swing which will visually hold all the other plants and elements in your garden.
5.Balance the elements
Visually your focal point should be heaviest so make sure your other plants do not draw attention away from it otherwise your garden will not look like it is in harmony.
A good plant to fill the background is one with heavy foliage which are consider to be a garden staple. They comes in different colors and they are perennials.
6.Tender , Loving care
How your garden will look and how long it will last is entirely up to you. Garden is alive so it needs a lot of constant tender loving care so that it will grow and thrive.

Strike the right balance of mass and space in your garden to give it an intriguing dimension and appeal. Inside our homes we arrange our furniture to make us feel comfortable within our space. If the furniture is too close together it makes the room seem crowded, if it is spaced too far apart the room can feel featureless. This balance between the bulky items (mass) and the open space (the void) , is vital in our gardens as much as it is in our houses.
The Key to Creating a Great Looking Garden
Unless you shape your lawn/patio or deck area correctly and use the landscape materials in the right way, your garden will look smaller, disjointed and unattractive, no matter how many nice plants and features you add.
If the underlying shapes are not right, the garden can NEVER look as good as you want it to.


So, for example, if you have a narrow garden, it needs different design shapes to a square or wide garden. Makes sense, doesn’t it? But which design shapes should you use for your garden?
There’s a Formula for Designing Small Gardens
What Shape Is Your Garden?
Every garden is different. Some are long and narrow, others are wide, small, large, square, the list goes on. This is what can make designing your garden difficult. Long, narrow gardens for instance, need to be made to look wider and with points of interest throughout in order to look really good.
Over the years I discovered that each type of garden has a set of things that needs to be done in order to achieve a successful design. Certain design shapes are effective for different types of garden.
Garden Plan
For example, in the garden plan featured on the top, you’ll see the shapes used have made this small gardens look much bigger.